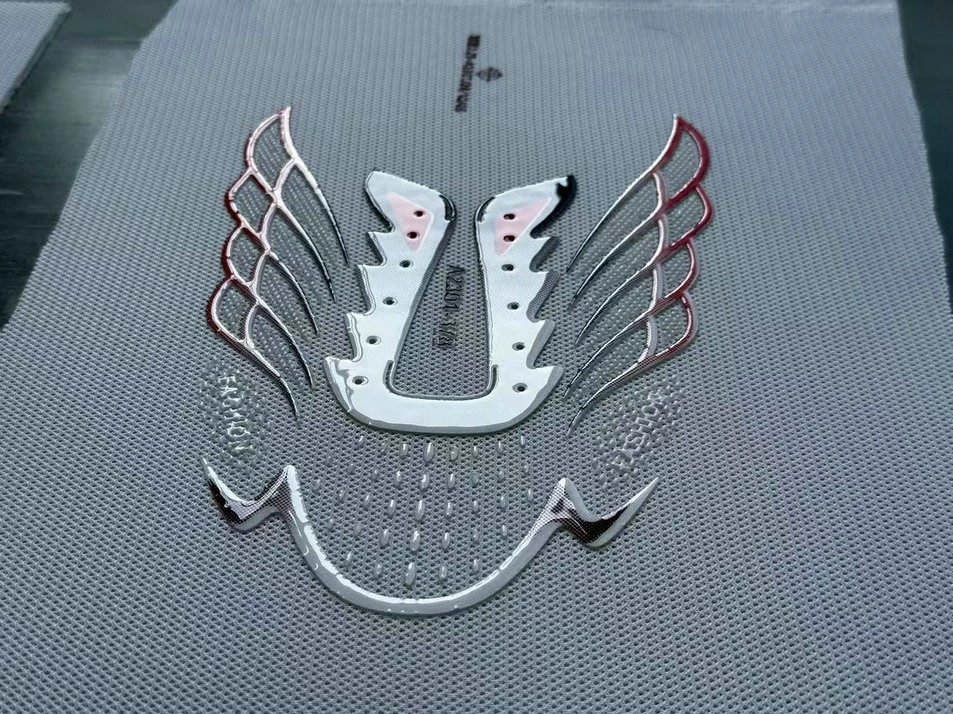
Direct Silicone Printing SOP for Flyknit / Sandwich Mesh Shoe Uppers
Application: Polyester flyknit, nylon mesh; 3D raised thick logos, anti-slip dots, flat thin prints; Two-component platinum-cure screen printing silicone (Part A + Part B)
Environmental requirement: Workshop humidity 50–60%; All tools, screens and squeegees must NOT contact sulfur, nitrogen, phosphorus or tin-containing substances (these will poison platinum catalyst, resulting in incomplete curing and sticky surface)
0. Pre-production Preparation
Cut pieces: Shoe upper cut panels, inspect fabric for oil stains, silicone residue and release agent. (Silicone / anti-wicking additives on fabric are the top cause of silicone bleeding and poor adhesion). Nylon mesh has heavy migration of additives, primer is mandatory; polyester mesh depends on fabric additives.
Screen preparation:
3D thick print: 80–120 mesh, thick stencil emulsion, film thickness 1000–1500 μm
Fine thin logo: 150–200 mesh
Squeegee: 65–70° polyurethane squeegee, print at 45° attack angle
Equipment: Table screen printer / rotary screen printer + IR flash dryer + tunnel oven
Ink materials: Shoe-grade platinum-cure screen silicone, silicone color paste, silicone-specific thinner (max addition ≤5–8%), nylon primer silicone, matte / glossy top-coat silicone
1. Fabric Pre-treatment (Critical Step)
Remove oil stains, wax and setting silicone: Plasma treatment / hot air blow / wipe with dedicated degreaser, then fully dry
Purpose: Eliminate fabric additives to prevent silicone bleeding, delamination and wash-off
Clean polyester mesh free of silicone residue can skip crosslink primer and print silicone primer directly
2. Ink Mixing + Vacuum Degassing
Mix ratio A:B follow the ink supplier TDS; common ratio 10:1
Add silicone color paste into Part A first and stir evenly (color paste ≤10–15%)
Add Part B platinum catalyst and stir slowly and thoroughly
Record pot life (4–8 hours). Mixed silicone will gel after expiry, mix on demand only
3. First Layer: Nylon Primer Silicone (Block mesh holes + anchoring layer)
Mesh fabric is porous. Direct printing of color silicone easily causes strike-through, backside bleeding and fuzzy edge.
Print 1–3 layers of nylon primer silicone
Flash dry after each print: 70–85℃, 10–20s. Only surface dry, DO NOT fully cure (full cure will weaken interlayer adhesion for subsequent layers)
Function: Fill mesh pores, form anchoring layer to stop color silicone penetrating through mesh, prevent exposure after stretching and peeling after washing
Flat thin print without high relief: 1 primer layer is enough; 3D thick print: 2–3 primer layers
4. Overprinting Color Silicone (Build thickness & color)
3D thick print: Multiple thin overprints. Do not deposit heavy thickness in one pass (thick layer causes internal uncuring, tackiness and bubbles)
Flash to surface dry after each layer before next print; normally 3–6 layers until color density and relief height are achieved
Key points: Keep consistent squeegee pressure and screen gap to avoid misregistration and uneven thickness; single layer thickness controlled at 0.15–0.3 mm
5. Top-Coating (Matte / Glossy Topcoat, mandatory for brand footwear)
✅ Matte (mainstream for sneakers): Matte silicone topcoat, print 1–2 layers. Allow leveling before baking, built-in matting agent ✅ Glossy: Glossy topcoat, rest 5–10 min after printing for bubble release and leveling before entering tunnel oven Function of topcoat: Improve abrasion resistance, anti-blocking, enhance Martindale abrasion performance, unify hand feel, protect color layer from whitening by friction
6. Final Tunnel Curing (Core step; under-curing = wash-off, tackiness & poor flex resistance)
Standard parameter for polyester flyknit: 110–120℃, 3–6 min Nylon mesh: Max temp 110℃, shorten dwell time to avoid fabric yellowing and shrinkage
7. Cooling & Post Cure Aging
Cool naturally to room temperature out of oven. Rest 2–4 hours before testing. Full performance normally achieved after 24h aging.